Oven Baked Ham and Cheese Sliders – Easy Party Food
This post may contain affiliate links (disclosure).
If you’re looking for the ultimate party food that’s easy to make and guaranteed to disappear fast, these Baked Ham And Cheese Sliders are it! Warm, gooey, and full of savory flavor, these mini sandwiches are layered with ham, Swiss cheese, and a buttery mustard glaze that takes them over the top. Whether you’re hosting a game day gathering, potluck, or just need a fun weeknight dinner, these sliders are a total crowd-pleaser that come together in just 35 minutes!

Want to save this recipe?
Why You’ll Love Baked Ham And Cheese Sliders
-
They’re quick and easy to make. You only need 15 minutes of prep time and simple ingredients to whip these up. Perfect for beginners or anyone short on time. The oven does all the work while you get ready for your guests!
-
Perfect for parties and gatherings. These sliders are ideal for feeding a crowd and always disappear fast. You can assemble them ahead of time and just pop them in the oven before serving. Everyone loves bite-sized, cheesy goodness!
-
The flavor combo is irresistible. Savory deli ham and melty Swiss cheese layered between sweet, soft rolls create the ultimate comfort food sandwich. The buttery mustard glaze adds a bold kick and a little crunch on top. Every bite is warm, gooey, and delicious!
-
Versatile for meals or snacks. Serve them as a party appetizer, easy dinner, or lunchbox treat. They’re just as tasty warm from the oven or at room temperature. You can even enjoy leftovers cold the next day!
-
Totally customizable. Don’t like Swiss cheese? Swap it out for cheddar or provolone. You can skip the poppy seeds, add sliced pickles, or use turkey instead of ham. This recipe is super flexible and works with what you have!

Ingredients For Baked Ham And Cheese Sliders
-
Melted butter – This creates a rich, golden topping that soaks into the rolls for amazing flavor.
-
Dijon mustard – Adds a sharp, tangy kick that balances the richness of the ham and cheese.
-
Worcestershire sauce – Deepens the savory flavor of the glaze with a little umami.
-
Poppy seeds – Optional, but they add texture and a nice crunch on top of the soft rolls.
-
Dried minced onion – Brings a subtle onion flavor without the need to chop anything.
-
Sandwich rolls (12 count) – Soft Hawaiian rolls or your favorite small buns hold everything together and get nice and toasty.
-
Deli ham – Thinly sliced ham gives the perfect salty, meaty layer inside each slider.
-
Swiss cheese – Melts beautifully and pairs perfectly with ham for that classic flavor combo.
For the exact measurements of the ingredients, see the printable recipe card at the bottom of this article.
Kitchen Tools You Need To Make Baked Ham And Cheese Sliders
-
9×13 inch baking dish – Holds all the sliders snugly while they bake evenly.
-
Mixing bowl – Used to stir together the flavorful mustard-butter glaze.
-
Whisk – Helps mix the butter and seasonings until smooth and well combined.
-
Measuring spoons – For accurately measuring mustard, Worcestershire sauce, and spices.
-
Measuring cups – To measure the butter before melting.
-
Knife or serrated spatula – Makes slicing the baked sliders into individual portions quick and easy.
How To Make Baked Ham And Cheese Sliders
-
Preheat your oven to 350°F and lightly grease a 9×13-inch baking dish.
-
Mix the melted butter, Dijon mustard, Worcestershire sauce, poppy seeds, and dried onion in a bowl until smooth.
-
Slice the sandwich rolls in half horizontally and place the bottom halves in the baking dish.
-
Layer on half the ham, then all of the Swiss cheese, and finish with the rest of the ham.
-
Add the top halves of the rolls to close the sandwiches.
-
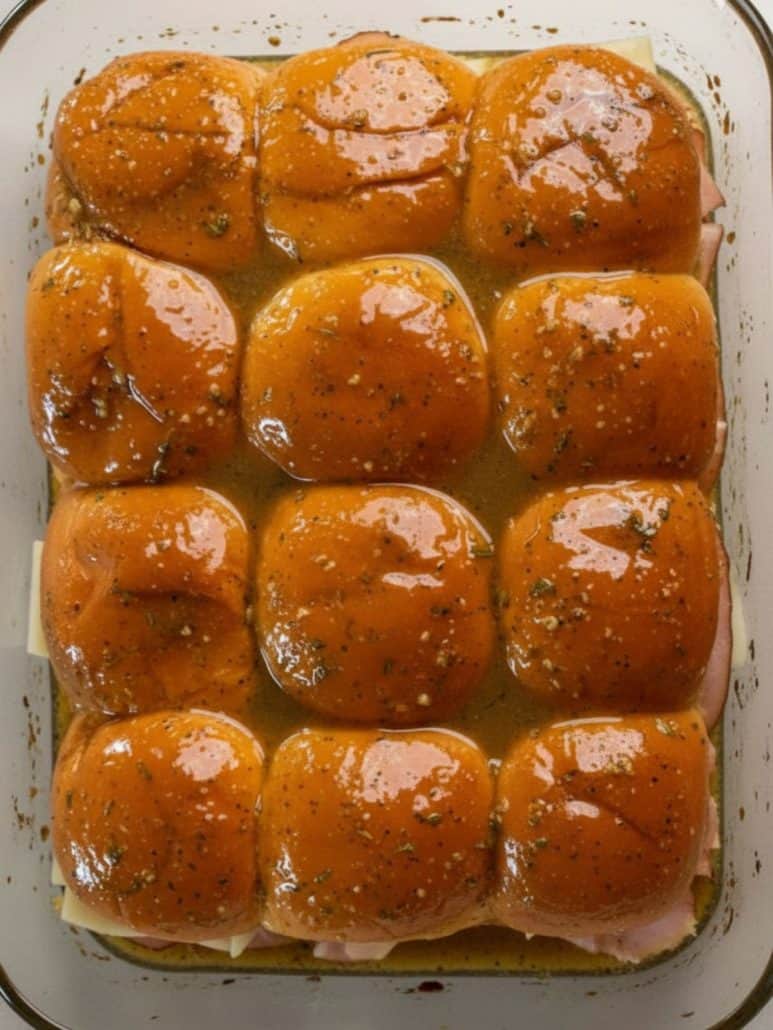
Pour the butter mixture evenly over the tops, letting it soak in.
-
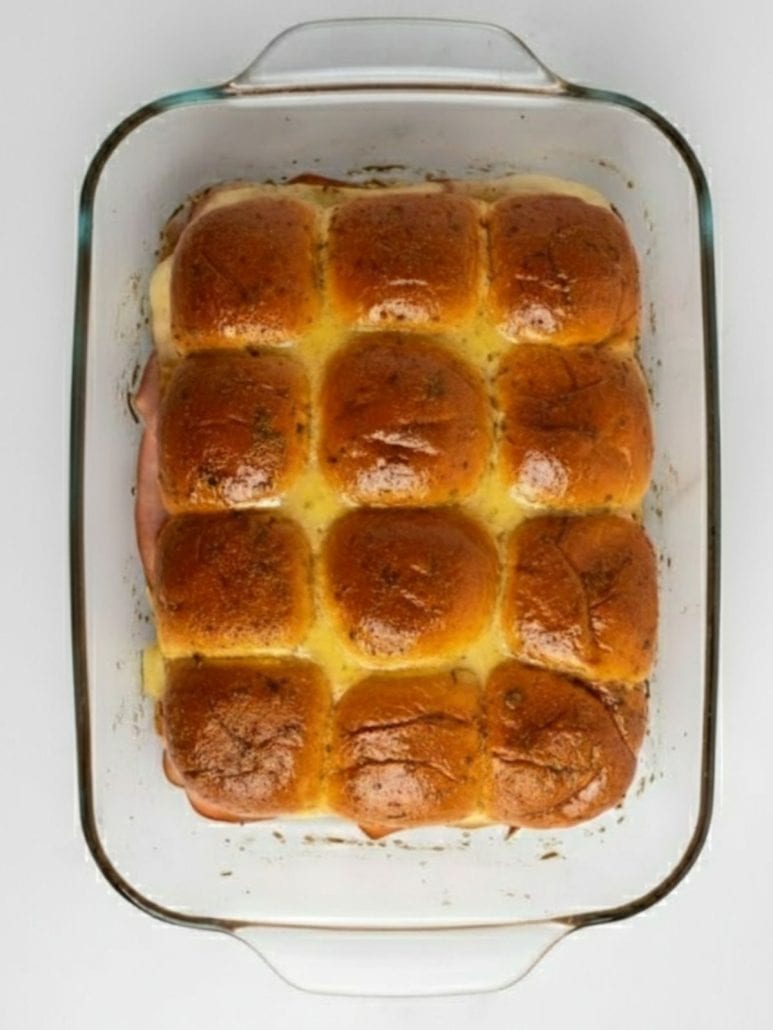
Cover the dish with foil and bake for 15 minutes, then uncover and bake 5 more minutes until golden and melty.
-
Cut into individual sliders and serve warm—they’ll be gone fast!

Serving Suggestions
-
Serve with sweet potato chips, homemade guacamole, or a side of crispy buffalo wings for the ultimate finger food spread.
Want to save this recipe?
-
Pair with a caprese salad, roasted broccoli and carrots, or potato wedges for a simple, satisfying meal.
-
Add to your brunch table with fruit salad with pomegranate, homemade deviled eggs, or a bisquick breakfast casserole.
-
Bring a tray of these to any gathering—they reheat well and are always a hit.
-
Cut sliders smaller and insert toothpicks for an easy grab-and-go appetizer that guests will love.

Tips For Success
-
Use connected rolls for easy assembly – Hawaiian rolls work perfectly because they’re slightly sweet and come as a whole sheet. Keep them together while slicing and layering to make the process quick and clean. Once baked, it’s easy to cut them into neat sliders.
-
Choose thinly sliced deli ham and real Swiss cheese – This ensures even melting and keeps the sliders from being too bulky. Thin slices also layer better and give every bite the perfect ham-to-cheese ratio.
-
Mix the butter glaze thoroughly – Before pouring, stir again to make sure the poppy seeds and minced onions haven’t settled. Drizzle the glaze slowly so it covers every slider evenly and soaks into the edges for extra flavor.
-
Cover with foil to start, then bake uncovered – The foil keeps the tops soft while the sliders heat through and cheese melts. Uncover for the last few minutes to get that perfectly golden, slightly crisp top.
-
Make ahead for convenience – Assemble the sliders, cover with foil, and refrigerate until ready to bake. Add a couple of minutes to the bake time if cooking straight from the fridge.
-
Let them rest before slicing – Give the sliders 5 minutes to rest after baking so they hold together better when serving. It helps the cheese set and prevents the fillings from sliding out.
Variations And Substitutions
-
Swap the meat – Not a fan of ham? You can use turkey, roast beef, or even pulled chicken. Any deli meat works well in this recipe—just slice it thin so the sliders don’t get too heavy.
-
Try different cheeses – Swiss cheese is classic, but you can mix it up with cheddar, provolone, mozzarella, or pepper jack for a spicy kick. You could even do a combo of two cheeses to add depth of flavor.
-
Make it vegetarian – Skip the meat and load the sliders with sautéed mushrooms, spinach, or roasted red peppers along with your favorite cheese. Add a sprinkle of Italian seasoning for extra taste.
-
Change the sauce – Dijon mustard adds a sharp flavor, but you can substitute honey mustard for a sweeter touch or yellow mustard for a milder taste. You can also leave out the Worcestershire if needed and add a splash of soy sauce or balsamic vinegar instead.
-
Adjust the topping – Don’t like poppy seeds? Leave them out or replace them with sesame seeds or everything bagel seasoning. You can also sprinkle a bit of shredded cheese on top before baking for an extra cheesy crust.
-
Make it spicy – Add a little heat by spreading some sriracha or spicy mayo on the inside of the rolls. You could also mix hot sauce into the butter glaze for a kick.
-
Use different breads – Sweet Hawaiian rolls are delicious, but slider buns, brioche, or dinner rolls also work great. Just choose something soft and fluffy that bakes well.
-
Mini or full-size options – You can make mini sliders for appetizers or use larger rolls to make full-sized sandwiches. Just adjust the bake time accordingly.
Storage And Reheating
-
Refrigerate leftovers – Store leftover sliders in an airtight container in the fridge for up to 2 days. They reheat well and still taste great the next day.
-
Reheat in the oven – Cover the sliders with foil and bake at 350°F for about 10-15 minutes until warmed through. This helps keep them soft without drying out.
-
Reheat in the microwave – For a quick option, microwave individual sliders for 30–45 seconds. The bread may soften a bit, but they’ll still taste delicious.
-
Freeze for later – You can assemble the sliders and freeze them before baking. Wrap tightly in foil and freeze for up to 3 months. Thaw overnight in the fridge, then bake as directed.
Frequently Asked Questions
Can I make ham and cheese sliders ahead of time?
Yes! You can fully assemble the sliders, cover them with foil, and refrigerate up to 24 hours in advance. When you’re ready to bake, pop them into the oven and just add a couple of extra minutes to the cooking time if they’re cold. This makes them perfect for prepping before parties or events. They’re a total time-saver and still taste freshly made!
Do I have to use Swiss cheese?
No, Swiss cheese is just the classic choice for flavor, but feel free to use whatever cheese you like. Cheddar, provolone, American, or mozzarella all melt well and work great in this recipe. You can even use two different cheeses to add variety. It’s easy to customize based on what you have on hand.
What kind of ham works best?
Thinly sliced deli ham works best because it layers well and melts evenly with the cheese. You can use regular, honey ham, smoked ham, or even leftover holiday ham. Just avoid thick slices so the sliders stay easy to bite into. For extra flavor, ask for cherrywood or black forest ham at the deli counter.
Can I make this recipe gluten-free?
Yes! Just use gluten-free slider rolls and double-check your Worcestershire sauce and mustard labels to ensure they’re gluten-free. The rest of the ingredients are naturally gluten-free. It’s an easy switch, and the sliders will still turn out delicious!
How do I keep the sliders from getting soggy?
To avoid soggy bottoms, don’t overdo it with the glaze and make sure to bake uncovered for the last 5 minutes. This helps the tops crisp up a little and allows steam to escape. If you’re making them ahead, assemble them but don’t pour the glaze on until just before baking. That way, the rolls stay fresh and not soggy.
Other Easy Ham Recipes
Air Fryer Ham and Cheese Sandwiches – These hot and melty ham and cheese sandwiches are perfectly crisped in the air fryer with no flipping needed.
Other Easy Cheese Recipes
Easy Cheese Quesadillas With Refried Beans – These cheesy quesadillas are stuffed with creamy refried beans and cooked until golden and gooey in minutes.
Tomato Burrata Salad With Basil And Olive Oil – Juicy tomatoes, fresh burrata, and fragrant basil come together with olive oil for a refreshing and elegant salad.
Mini Cream Cheese Stuffed Sweet Peppers – These colorful sweet peppers are filled with seasoned cream cheese and make the perfect no-cook party snack.
Baked Grilled Cheese Sandwiches – Make a batch of crispy grilled cheese sandwiches all at once with this easy oven-baked method.
Crispy Air Fryer Frozen Cheese Curds – Frozen cheese curds turn golden and crunchy in the air fryer—no oil or mess required!
Cheesy Baked Salmon With Mayo – Tender salmon is topped with a creamy mayo and melted cheese layer for a rich and flavorful baked dish.

Baked Ham And Cheese Sliders
Want to save this recipe?
Ingredients
- ¾ cup butter melted
- 1 ½ tbsp Dijon mustard
- 1 ½ tsp Worcestershire sauce
- 1 ½ tbsp poppy seeds adds crunch
- 1 tbsp minced onion dried
- 12 sandwich rolls like Hawaiian sweet rolls
Recommended Kitchen Tools (click the links below to see the items used to make this recipe)
- 9x13 inch baking dish
- Knife or serrated spatula for slicing
- Foil used to cover the sliders while baking
Instructions
- Preheat oven to 350°F. Grease a 9x13-inch baking dish.
- In a bowl, mix melted butter, Dijon mustard, Worcestershire sauce, poppy seeds, and minced onion.
- Slice rolls in half horizontally (keep bottoms and tops intact as groups) and place the bottom halves in the prepared dish.
- Layer half the ham evenly over the bottom rolls, then add all the Swiss cheese, followed by the rest of the ham.
- Place the tops of the rolls back on to form sandwiches.
- Pour the mustard-butter mixture evenly over the sliders, letting it soak into the tops.
- Cover loosely with foil and bake for 15 minutes. Then uncover and bake 5 more minutes until golden brown and cheese is melted.
- Slice into individual sliders and serve warm!
Notes
- These sliders taste amazing both hot and at room temperature, making them perfect for serving at parties.
- You can make these ahead of time and store them in the fridge, then bake just before serving.
Nutrition
More Sandwich Recipes
- Copycat Subway Tuna Sandwich With Mayo
- BBQ Chicken Melt Sandwich With Cheese
- Cream Cheese And Smoked Salmon Sandwich


It’s a keeper!