Easy No-Bake Pumpkin Oreo Balls
This post may contain affiliate links (disclosure).
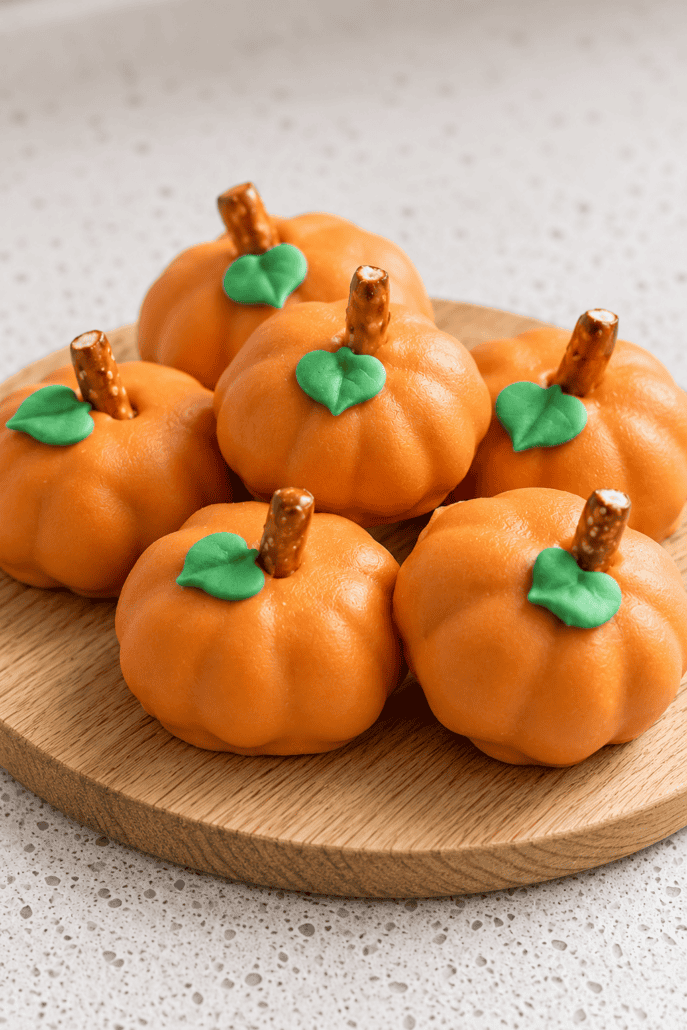
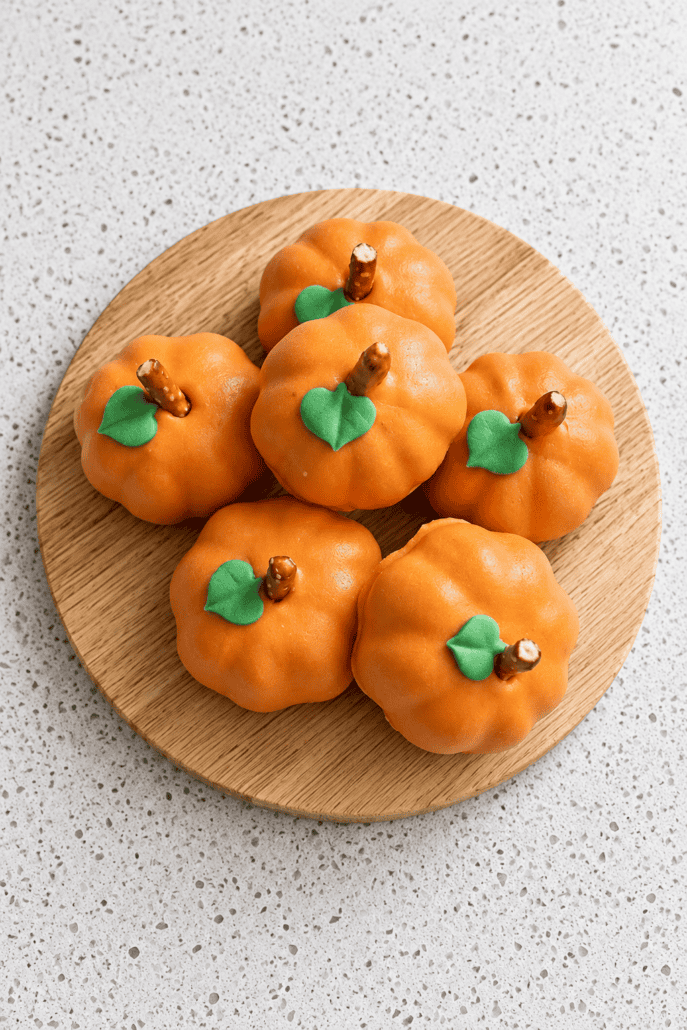
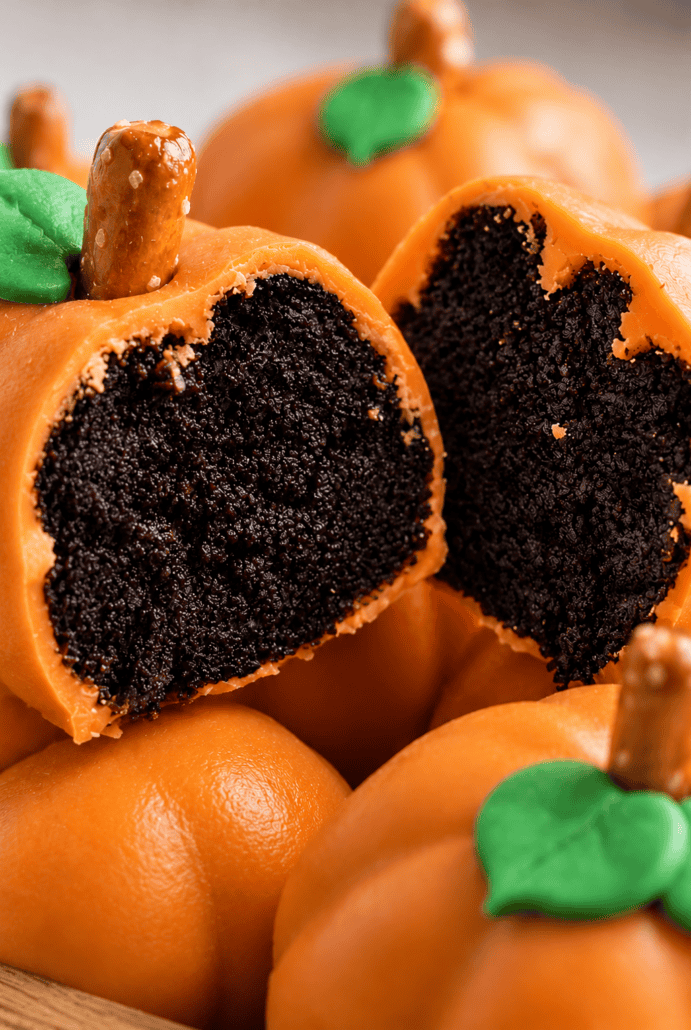
These fun and festive Pumpkin Oreo Balls are an easy no-bake dessert that’s perfect for Halloween, Thanksgiving, and fall parties. With a creamy Oreo and cream cheese filling coated in sweet orange candy melts, every bite is rich, chocolatey, and delicious. Each Oreo ball is shaped like a cute little pumpkin and decorated with a pretzel stem and green icing leaf for an adorable fall treat. You only need 5 simple ingredients to make these pumpkin-shaped Oreo truffles, and there’s no oven needed. They’re perfect for holiday dessert platters, parties, or whenever you’re craving a sweet homemade treat.
Want to save this recipe?
Why You’ll Love Pumpkin Oreo Balls
- Easy No-Bake Dessert – These Pumpkin Oreo Balls are so easy to make without turning on the oven! Just crush the cookies, mix with cream cheese, and shape them into little pumpkins. Dip them in melted orange candy coating and add the decorations. It’s a simple recipe that’s perfect for beginners.
- Rich and Creamy Flavor – Every bite is filled with delicious chocolatey Oreo goodness! The crushed cookies blend perfectly with the cream cheese to create a smooth and creamy filling. The sweet orange candy coating adds a delicious layer of sweetness. These little treats are perfect for satisfying your sweet tooth.
- Perfect for Fall Celebrations – These adorable pumpkin-shaped Oreo balls are a fun addition to any holiday dessert table! Their bright orange coating and cute pumpkin decorations make them perfect for Halloween and Thanksgiving. They’re also great for fall parties, family gatherings, and potlucks. Everyone will love these festive little treats.
- Made With Just 5 Ingredients – You don’t need a long shopping list to make these delicious Pumpkin Oreo Balls! All you need are Oreo cookies, cream cheese, orange candy melts, pretzel sticks, and green leaf icing decorations. These simple ingredients come together to create a fun and impressive dessert. It’s an easy way to make something special without a lot of effort.
- Fun to Make and Decorate – Making these Pumpkin Oreo Balls is a fun activity for the whole family! Kids will love helping roll the Oreo mixture into balls and adding the cute pumpkin decorations. The pretzel stems and green leaves make each little pumpkin look adorable. It’s a delicious treat that’s just as fun to make as it is to eat.
- Great for Making Ahead – These Pumpkin Oreo Balls are perfect when you want to prepare dessert before a party! You can make them ahead of time and keep them refrigerated until you’re ready to serve. The chilled Oreo filling stays firm and tastes delicious with the sweet candy coating. This makes holiday entertaining so much easier.
Ingredients For Pumpkin Oreo Balls
-
Oreo Cookies – These chocolate sandwich cookies are the main ingredient for the delicious Oreo filling. Crush them into fine crumbs so they mix easily with the cream cheese.
-
Cream Cheese – Softened cream cheese holds the Oreo crumbs together and gives the filling a rich, smooth, and creamy texture.
-
Orange Candy Melts – These give the Oreo balls their bright orange pumpkin color and create a sweet candy coating around the creamy filling.
-
Pretzel Sticks – Break the pretzel sticks into small pieces to create cute little stems for each pumpkin. They also add a nice crunchy touch!
-
Green Leaf Icing Decorations – These make the perfect finishing touch for your pumpkin-shaped Oreo balls. Place one next to each pretzel stem to make the pumpkins look extra festive.
For the exact measurements of the ingredients, see the printable recipe card at the bottom of this article.
How To Make Pumpkin Oreo Balls
-
Start by adding the Oreo cookies to a food processor. Blend until the cookies are crushed into fine, even crumbs.
-
Transfer the Oreo crumbs to a large bowl and mix in the softened cream cheese. Stir everything together until you have a thick, smooth mixture that holds its shape.
-
Use a small cookie scoop to divide the mixture into 24 equal portions. Roll each portion between your hands to form a ball, then arrange them on a baking sheet covered with parchment paper.
-
Put the Oreo balls in the refrigerator for 15 minutes to help them become firm and easier to shape.
-
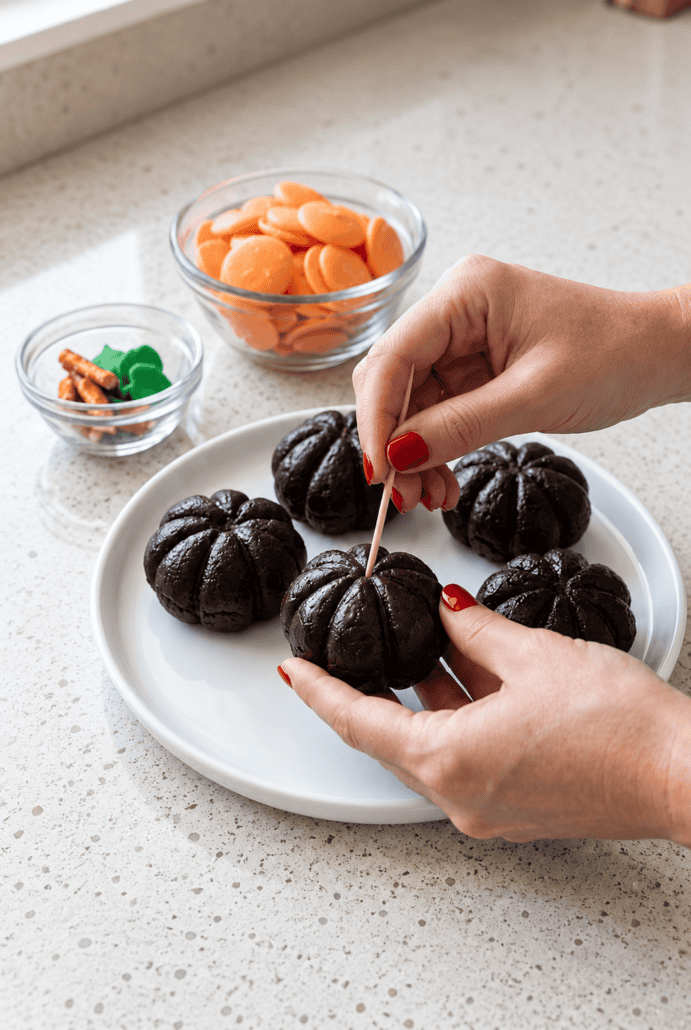
Take the chilled Oreo balls out of the refrigerator and gently press a toothpick along the sides of each one. Make several vertical lines around the balls to create the look of little pumpkins.
-
Place the shaped Oreo balls back in the refrigerator for another 10 minutes to help them keep their shape.
-
While the Oreo balls are chilling, melt the orange candy melts in a microwave-safe bowl according to the package directions. Stir until the coating is completely melted and smooth.
Want to save this recipe?
-
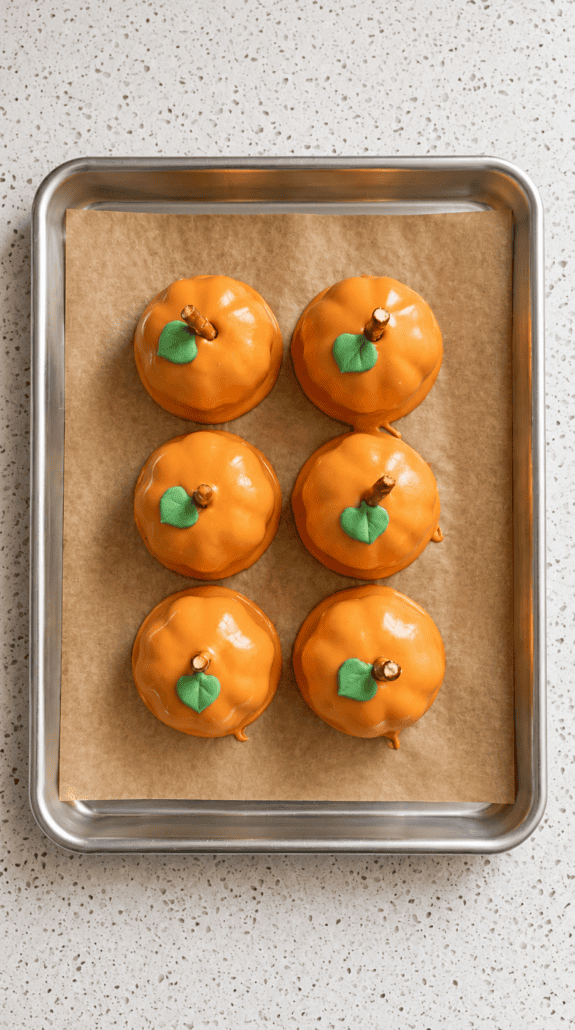
Remove the Oreo balls from the refrigerator and carefully coat each one in the melted orange candy. Use a fork or spoon to lift them out, letting any extra coating drip back into the bowl.
-
Set the coated Oreo balls onto the parchment-lined baking sheet. Before the coating hardens, gently press a small piece of pretzel stick into the top of each pumpkin to make the stem.
-
Add a green leaf icing decoration next to each pretzel stem for the finishing touch. Refrigerate the Pumpkin Oreo Balls until the candy coating is firm, then serve and enjoy.
Serving Suggestions
- Arrange these pumpkin Oreo balls on a festive Halloween serving tray with other sweet treats. Their bright orange color makes them perfect for a spooky party spread.
- Serve these adorable pumpkin-shaped Oreo truffles alongside homemade pumpkin pie or apple pie for a delicious holiday dessert selection. They’re a fun, bite-sized treat that guests will love.
- Place the pumpkin Oreo balls on a decorative platter with fall-themed napkins and decorations. They’re perfect for autumn gatherings, potlucks, and family celebrations.
- Enjoy these sweet Oreo balls with a warm cup of Turkish coffee, tea with lemon and honey, or white chocolate hot cocoa. The rich chocolate filling tastes delicious with your favorite cozy fall drink.
- Arrange the chilled pumpkin Oreo balls in a cute treat box lined with parchment paper. They make a fun homemade gift for friends, family, or neighbors during the fall season.
- Serve these little pumpkin treats in colorful cupcake liners for easy grabbing. They’re great for Halloween parties, school celebrations, or any occasion that calls for a fun and delicious dessert.
Tips For Success
- Use Regular Oreo Cookies – Regular Oreo cookies work best for this recipe. Avoid Double Stuf Oreos because the extra filling can make the mixture too soft. Crush the entire cookies, including the cream filling, for the best results. This creates a rich and chocolatey base that holds together nicely.
- Soften the Cream Cheese – Make sure your cream cheese is softened before mixing it with the crushed Oreos. Soft cream cheese blends more easily and helps create a smooth filling. If the cream cheese is too cold, it can be difficult to mix evenly. A well-combined mixture makes rolling the Oreo balls much easier.
- Crush the Cookies Finely – Use a food processor to turn the Oreo cookies into fine crumbs. Large cookie pieces can make the mixture harder to shape into smooth balls. The finer the crumbs, the easier it will be to combine them with the cream cheese. This also gives the Oreo balls a delicious, creamy texture.
- Make Evenly Sized Oreo Balls – Use a small cookie scoop to portion out the Oreo mixture. This helps make all 24 Oreo balls about the same size. Roll each portion gently between your hands until smooth. Evenly sized balls make the finished pumpkin treats look beautiful on a serving platter.
- Don’t Skip the Chilling Time – Refrigerating the Oreo balls helps them firm up before shaping and dipping. Chill them for 15 minutes before making the pumpkin grooves. After shaping, refrigerate them for another 10 minutes. This helps the Oreo balls hold their pumpkin shape when covered with melted candy.
- Shape the Pumpkins Gently – Use a toothpick to create vertical grooves around each chilled Oreo ball. Press lightly so you don’t break or flatten the balls. Make several evenly spaced lines to give them a realistic pumpkin appearance. Don’t worry if they aren’t perfect because each little pumpkin will look adorable!
- Melt the Candy Coating Carefully – Follow the package instructions when melting the orange candy melts. Stir until the coating is smooth and easy to work with. Avoid overheating the candy melts, as this can affect their consistency. Smooth melted candy makes dipping the Oreo balls much easier.
- Decorate Before the Coating Hardens – Add the pretzel stems and green leaf icing decorations immediately after dipping each Oreo ball. The soft candy coating helps hold the decorations in place. If you wait too long, the coating may become firm before you finish decorating. Work with one Oreo ball at a time for the best results.
- Keep the Oreo Balls Refrigerated – Store the finished Pumpkin Oreo Balls in the refrigerator until you’re ready to serve. The cream cheese filling tastes best when chilled and firm. Keeping them cold also helps maintain their shape and texture. For the best results, avoid leaving them at room temperature for longer than one hour.
Variations And Substitutions
- Pumpkin Spice Oreos – For an extra festive fall flavor, use pumpkin spice Oreo cookies instead of regular Oreos. The pumpkin spice flavor adds a delicious seasonal twist to these sweet treats. You can follow the same recipe instructions without changing the other ingredients. This variation is perfect for Thanksgiving or any autumn gathering.
- Gluten-Free Oreo Balls – Make these treats gluten-free by using gluten-free Oreo cookies instead of regular ones. Be sure to choose gluten-free pretzel sticks for the pumpkin stems, too. Check the labels on the candy melts and decorations to make sure they’re suitable for your dietary needs. This is an easy way to make a festive dessert that more guests can enjoy.
- Different Green Decorations – If you can’t find green leaf icing decorations, green M&M candies are a great substitute. You can also use a small amount of green icing to create little leaves next to the pretzel stems. Both options give the Oreo balls that adorable pumpkin appearance. Use whichever decoration is easiest to find!
- Different Candy Coatings – Orange candy melts give these Oreo balls their classic pumpkin appearance, but you can experiment with other colors. Try white, green, or purple candy melts for different holiday themes. You can also use chocolate candy melts for a more traditional Oreo truffle. Just remember that changing the coating color will change the finished look of your treats.
- Mini Pumpkin Oreo Balls – Make smaller Oreo balls for a bite-sized party dessert. Simply scoop out smaller portions of the Oreo mixture and roll them into little balls. Use shorter pretzel pieces and smaller decorations to match their size. These mini treats are perfect for dessert platters, Halloween parties, and holiday gatherings.
- Different Holiday Shapes – This easy Oreo ball recipe isn’t just for fall! Instead of making pumpkin grooves, leave the truffles round and decorate them with different candy colors and sprinkles. You can make festive treats for Christmas, Easter, Valentine’s Day, or birthday parties. The creamy Oreo filling tastes delicious no matter how you decorate it!
- Dairy-Free Option – For a dairy-free variation, try using plant-based cream cheese and dairy-free candy coating. Check that your Oreo cookies and decorations also meet your dietary requirements. Keep in mind that dairy-free cream cheese may have a different consistency, so the Oreo mixture might need extra chilling time. This substitution is worth trying if you want a dairy-free version of these festive treats.
Storage And Reheating
- Refrigerator – Store Pumpkin Oreo Balls in an airtight container in the refrigerator for up to 3–4 days. Keep them chilled to maintain their firm texture and creamy filling.
- Freezer – Place the Oreo balls in a freezer-safe container and freeze for up to 2 months. Thaw them in the refrigerator before serving.
- Reheating – No reheating is needed! These no-bake Pumpkin Oreo Balls taste best served chilled, straight from the refrigerator.
- Serving Tip – Avoid leaving the Oreo balls at room temperature for longer than one hour to keep the cream cheese filling firm and the candy coating intact.
Frequently Asked Questions
Can I Make Pumpkin Oreo Balls Ahead Of Time?
Yes! Pumpkin Oreo Balls are a great make-ahead dessert for Halloween, Thanksgiving, and fall parties. You can prepare them a day or two before your event and store them in an airtight container in the refrigerator. Keeping them chilled helps the cream cheese filling stay firm and delicious. When you’re ready to serve, simply take them out of the refrigerator and arrange them on a festive platter.
Do Pumpkin Oreo Balls Need To Be Refrigerated?
Yes, Pumpkin Oreo Balls should be kept in the refrigerator because they contain cream cheese. Refrigerating them also helps maintain their shape and keeps the chocolatey filling firm. Store them in an airtight container until you’re ready to enjoy them. For the best texture, avoid leaving them at room temperature for longer than one hour.
Can I Use Pumpkin Spice Oreos Instead Of Regular Oreos?
Absolutely! Pumpkin spice Oreos are a delicious substitute for regular Oreo cookies in this recipe. They add a fun seasonal flavor that makes these treats even more festive for fall. Simply use the same number of pumpkin spice Oreos and follow the recipe as directed. There’s no need to adjust the other ingredients.
Can I Make Pumpkin Oreo Balls Without A Food Processor?
Yes! If you don’t have a food processor, place the Oreo cookies in a sealed plastic bag and crush them using a rolling pin. Make sure the cookies are crushed into very fine crumbs so they combine easily with the cream cheese. Transfer the crumbs to a mixing bowl and continue following the recipe. This simple method works great!
Why Are My Oreo Balls Too Soft To Shape?
If your Oreo balls feel too soft or sticky, the mixture may need more time in the refrigerator. Chilling helps the cream cheese filling become firm enough to roll and shape. Place the mixture in the refrigerator until it’s easier to handle. Also, make sure you’re using regular Oreos instead of Double Stuf Oreos, which can make the filling softer.
How Do I Make The Oreo Balls Look Like Pumpkins?
Making the pumpkin shape is easier than you might think! After rolling the Oreo mixture into balls and chilling them, use a toothpick to gently press vertical grooves around each ball. These little lines give the truffles their pumpkin appearance. Once dipped in orange candy melts, add a small pretzel stick for the stem and a green icing leaf for decoration.
What Can I Use Instead Of Green Leaf Icing Decorations?
If you can’t find green leaf icing decorations, green M&M candies are an easy alternative! Simply place one green M&M next to the pretzel stem while the candy coating is still soft. You can also use green icing to pipe a small leaf on top of each pumpkin. Both options make these Oreo balls look adorable and festive.
Can I Freeze Pumpkin Oreo Balls?
Yes, you can freeze Pumpkin Oreo Balls for later! Arrange them in a freezer-safe container, separating layers with parchment paper to help prevent sticking. Freeze for up to two months for the best quality. When you’re ready to enjoy them, transfer the Oreo balls to the refrigerator and allow them to thaw before serving. There’s no need to reheat them.
Why Is My Orange Candy Coating Too Thick?
Candy melts can become thick if they’re overheated or aren’t melted properly. Always follow the package directions and stir until the coating is smooth. When using the microwave, heat the candy melts in short intervals to avoid overheating. A smooth coating makes it easier to dip the Oreo balls and gives the finished pumpkins a beautiful appearance.
Can I Make These Pumpkin Oreo Balls Gluten-Free?
Yes! You can make a gluten-free version by replacing regular Oreo cookies with gluten-free Oreos. You’ll also need gluten-free pretzel sticks for the pumpkin stems. Check the labels on the orange candy melts and green decorations to make sure they’re gluten-free as well. This simple substitution allows you to enjoy the same festive treat while accommodating gluten-free dietary needs.
How Many Pumpkin Oreo Balls Does This Recipe Make?
This recipe makes approximately 24 Pumpkin Oreo Balls when you roll the mixture into 1-inch balls. Using a small cookie scoop helps keep the portions even, so all your little pumpkins are about the same size. You can make smaller balls if you prefer bite-sized treats, but the total number of servings will increase. They’re perfect for sharing at fall gatherings and holiday parties!
Can I Use Melted Chocolate Instead Of Orange Candy Melts?
Yes, you can use melted chocolate instead of orange candy melts, but the finished Oreo balls won’t have the same bright orange pumpkin color. If you want to keep the pumpkin theme, orange candy melts are the easiest option. They create a sweet outer coating that looks festive and holds the pretzel stems and green decorations in place.
Other Easy Oreo Recipes
- No-Bake Oreo Sushi
- Oreo Cookie Milkshake
- Chewy Oreo Cheesecake Cookies
- Cookies and Cream Dip
- Crescent Roll Fried Oreos
- Oreo Cookies and Cream Chocolate Cake
- Oreo Cream Cheese Truffles
Pumpkin Oreo Balls
Want to save this recipe?
Ingredients
- 36 Oreo cookies
- 8 oz cream cheese softened
- 12 oz orange candy melts
- 6 pretzel sticks each broken into 4 small pieces, 24 stems total
- 24 green leaf icing decorations 1 per Oreo ball
Instructions
- Place the Oreo cookies in a food processor and blend until they become fine crumbs.
- Add the softened cream cheese to the cookie crumbs and mix until completely combined.
- Scoop the mixture and roll it into 24 balls, approximately 1 inch in diameter. Place them on a parchment-lined baking sheet.
- Refrigerate the Oreo balls for 15 minutes to firm up.
- Use a toothpick to gently create vertical grooves around each Oreo ball to give it a pumpkin shape.
- Return the shaped Oreo balls to the refrigerator for another 10 minutes.
- Melt the orange candy melts in a microwave-safe bowl or double boiler according to the package directions. Stir until smooth.
- Dip each Oreo ball into the melted orange candy coating, allowing the excess to drip off. Place back on the parchment-lined baking sheet.
- Immediately insert a small pretzel piece into the top of each Oreo ball to make a pumpkin stem. Add one green leaf icing decoration next to each stem.
- Refrigerate until the candy coating is firm. Keep chilled until ready to serve.
Notes
-
Use green M&M candies instead of green leaf icing decorations for an easy alternative.
-
Keep Pumpkin Oreo Balls refrigerated until ready to serve so they stay firm and fresh.