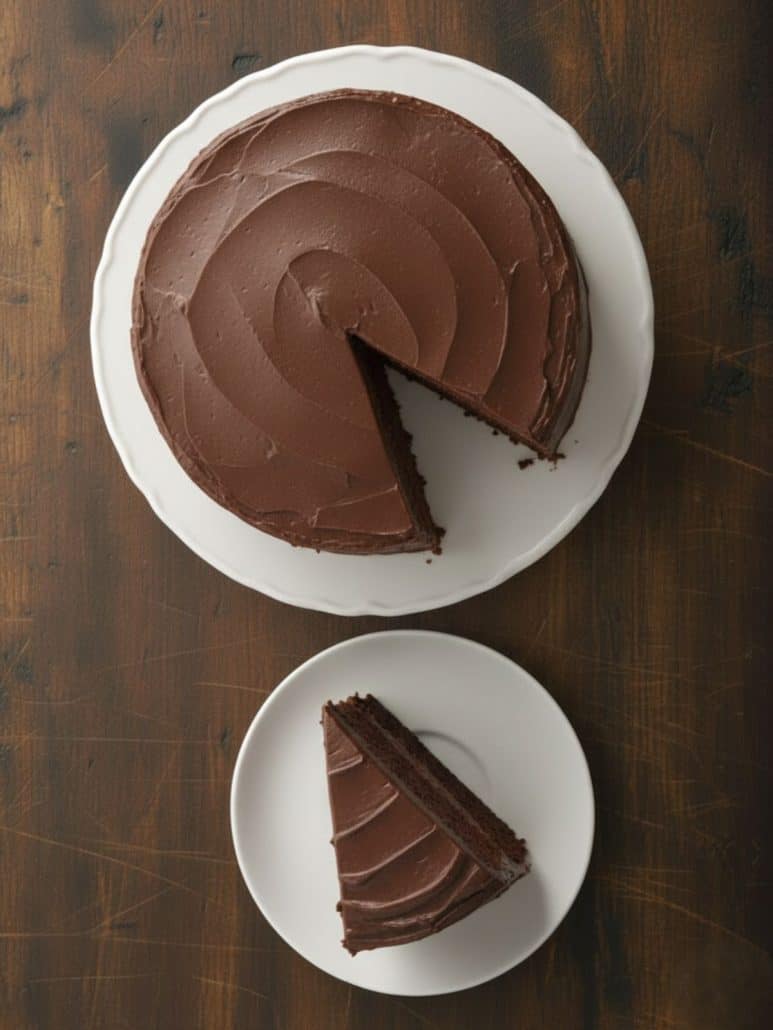
One Bowl Chocolate Cake – Incredibly Moist & Fluffy
This post may contain affiliate links (disclosure).
If you’ve been searching for the perfect easy chocolate cake recipe, this one bowl chocolate cake is about to become your go-to! It’s rich, fluffy, super moist, and made with simple ingredients you probably already have in your kitchen. No need for a boxed mix or multiple bowls—just mix, pour, and bake! Whether you’re celebrating a birthday, holiday, or just need a chocolate fix, this homemade cake delivers big flavor with minimal cleanup. And don’t forget the frosting—this chocolate chip frosting takes it to the next level!

Why You’ll Love One Bowl Chocolate Cake
-
Quick and easy cleanup: Everything comes together in just one mixing bowl, so there’s no mountain of dishes to tackle afterward. It’s the perfect cake for busy days or when you want homemade flavor without the extra mess. Even beginner bakers will feel confident making this. It’s practically foolproof!
-
Super moist and fluffy texture: The batter is thin, which might seem odd at first, but that’s what gives this cake its irresistible light and moist crumb. Every bite is soft and tender, never dry. It’s the kind of cake that melts in your mouth. You’ll be reaching for a second slice before you know it!
-
Pantry-friendly ingredients: No fancy ingredients required here—just simple basics like flour, sugar, cocoa, and eggs. You likely already have everything on hand. It’s the perfect last-minute dessert recipe when you need something quick. Homemade chocolate cake has never been more convenient!
-
Perfect for any occasion: Whether it’s a birthday, dinner party, or just a chocolate craving, this cake fits the bill. It’s elegant enough for guests but easy enough for weeknights. Serve it plain or dress it up with your favorite frosting. It’s always a crowd-pleaser!
-
Customizable and versatile: Make it in round pans, a sheet pan, or even as cupcakes—the batter adapts beautifully. You can frost it with buttercream, cream cheese, or try this easy chocolate chip frosting
. You can even add chocolate chips or espresso for a deeper flavor. It’s a base recipe that you’ll come back to again and again.Want to save this recipe?
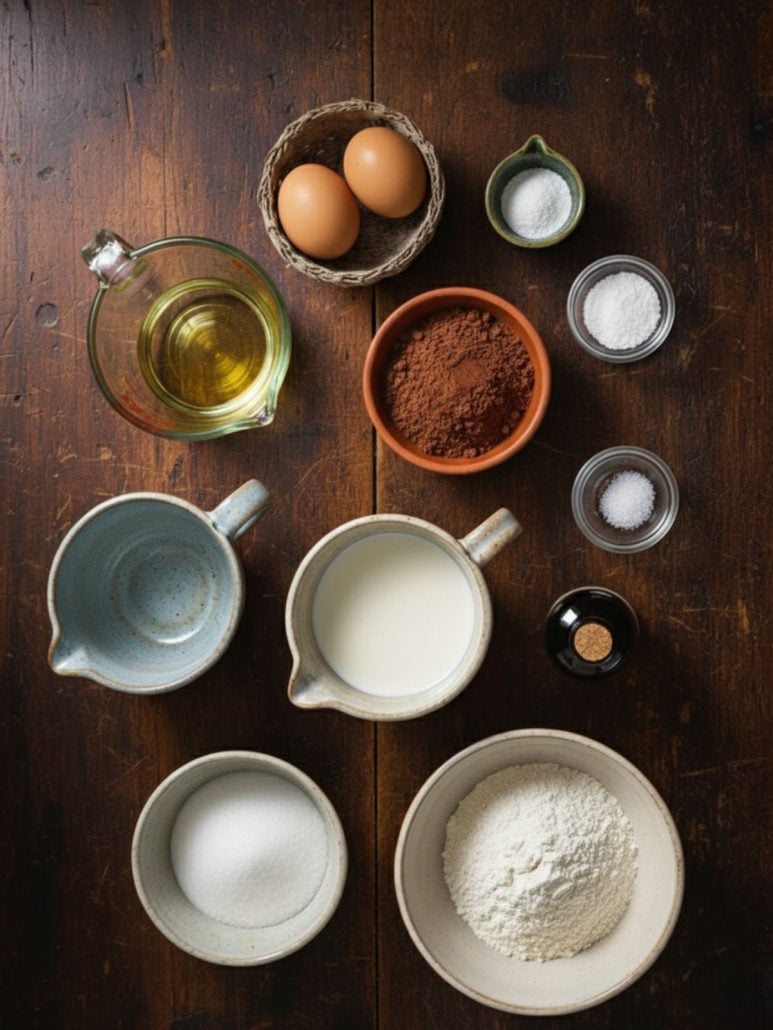
Ingredients For One Bowl Chocolate Cake
-
White sugar – Adds sweetness and helps keep the cake moist.
-
All-purpose flour – The base of the cake that gives it structure and softness.
-
Unsweetened cocoa powder – Provides that deep, rich chocolate flavor.
-
Baking powder and baking soda – These leavening agents help the cake rise and become light and fluffy.
-
Salt – Enhances the chocolate flavor and balances the sweetness.
-
Eggs – Bind the ingredients together and give the cake structure.
-
Milk – Adds moisture and helps create a tender crumb.
-
Vegetable oil – Keeps the cake extra moist and soft.
-
Vanilla extract – Adds a warm, sweet flavor that complements the chocolate.
-
Boiling water – Thins the batter and intensifies the cocoa flavor for a moist, rich cake.
For the exact measurements of the ingredients, see the printable recipe card at the bottom of this article.
Kitchen Tools You Need To Make One Bowl Chocolate Cake
-
Mixing bowl – You’ll only need one large bowl to mix everything together, which keeps cleanup easy.
-
Electric hand mixer or stand mixer – Speeds up mixing and ensures a smooth batter.
-
Measuring cups – For accurately measuring dry and liquid ingredients.
-
Measuring spoons – Helpful for smaller quantities like baking powder, salt, and vanilla.
-
Rubber spatula – Great for scraping down the sides of the bowl so nothing goes to waste.
-
Two 9-inch round cake pans – Used to bake the cake layers evenly.
-
Wire cooling rack – Helps the cakes cool faster and prevents sogginess on the bottom.
How To Make One Bowl Chocolate Cake
-
Preheat your oven and prepare your cake pans by greasing and flouring them so the cakes don’t stick.
-
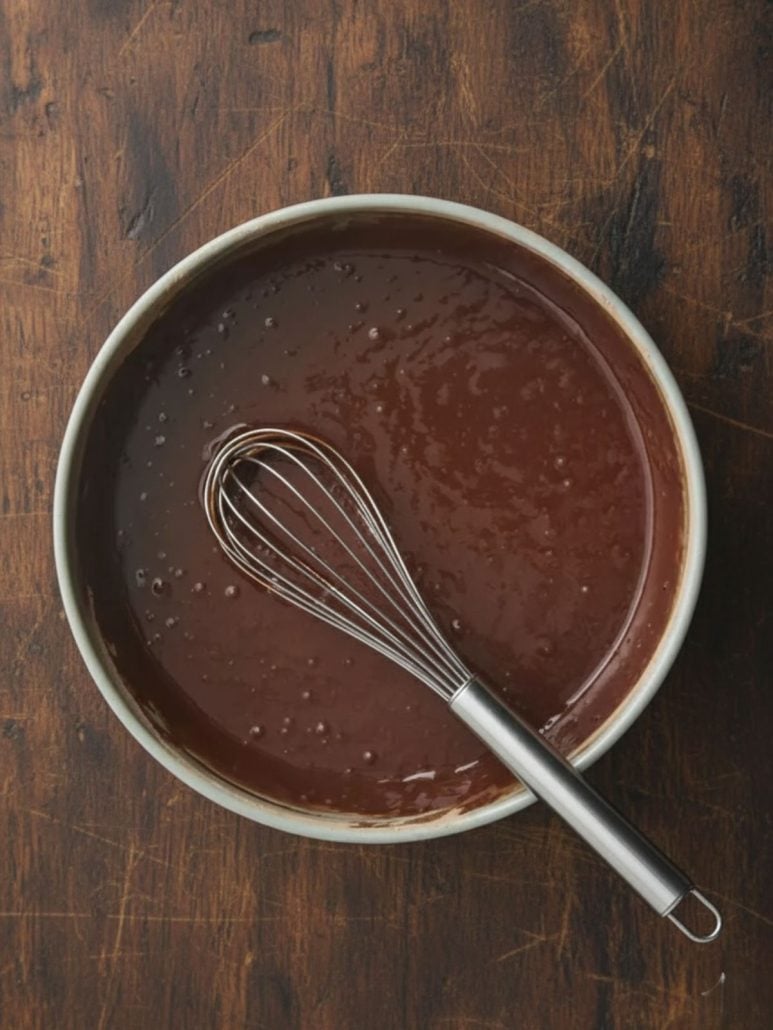
In one large bowl, combine all the dry ingredients and whisk them together to evenly distribute everything.
-
Add in the eggs, milk, oil, and vanilla, then mix until the batter is smooth and well blended.
-
Carefully stir in the boiling water—don’t worry if the batter looks thin, that’s exactly how it should be.
-
Divide the batter evenly between the two pans, using a spatula to help smooth the tops.
-
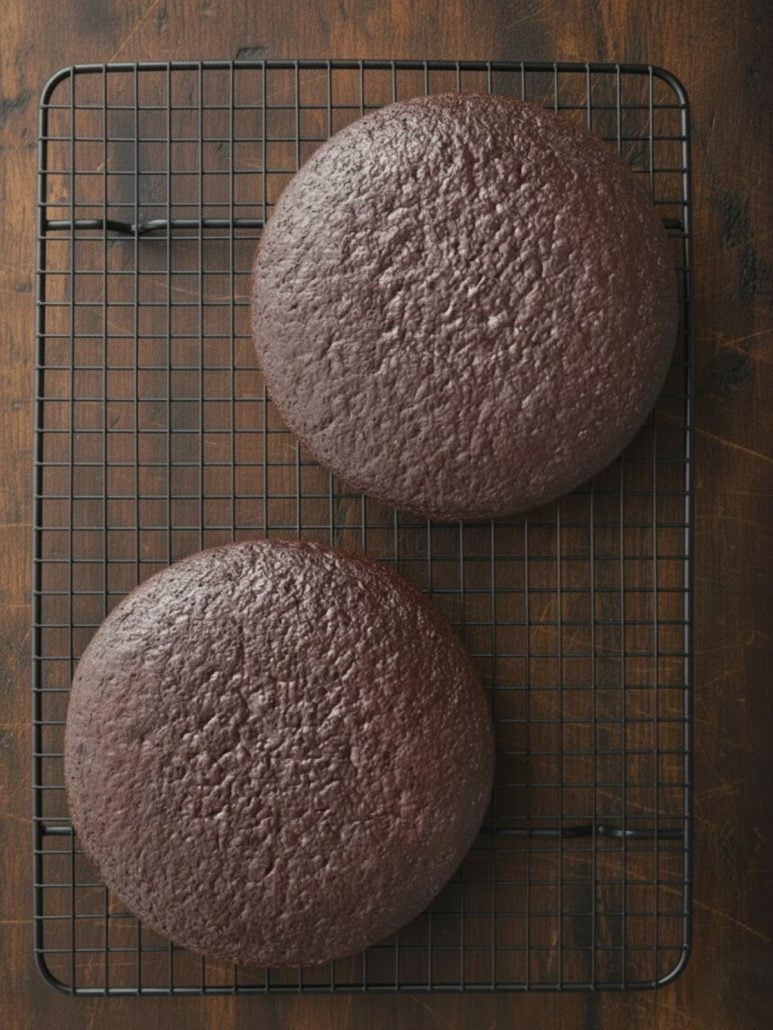
Bake until a toothpick inserted in the center comes out clean, then let the cakes cool in the pans for a few minutes.
-
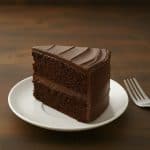
Transfer the cakes to a wire rack and let them cool completely before adding your favorite frosting.
-
For a delicious topping, try this chocolate frosting made with chocolate chips.
Serving Suggestions
-
Stack the two cake layers with a thick layer of vanilla whipped cream frosting in between and on top. Decorate with chocolate shavings or sprinkles for a festive touch.
-
Pour the batter into cupcake liners and bake for about 20 minutes. Top with a swirl of vanilla buttercream frosting for an easy handheld dessert.
-
Serve a slice warm with a scoop of banana ice cream or chocolate banana ice cream for a rich, indulgent treat.
-
For a more minimalist presentation, dust the top with powdered sugar instead of frosting.
-
Decorate with themed sprinkles or frosting colors for birthdays, Valentine’s Day, or Christmas.
Want to save this recipe?
Tips For Success
-
Grease and flour your pans well – This prevents the cakes from sticking and helps them release cleanly. You can also use parchment paper on the bottom for extra insurance.
-
Whisk the dry ingredients first – It only takes a few seconds but helps distribute the baking powder, soda, and cocoa evenly. This makes the cake rise consistently and gives it a better texture.
-
Use boiling water, not just hot tap water – It might seem strange, but boiling water helps bloom the cocoa powder. It makes the cake extra chocolatey and super moist.
-
Don’t worry if the batter looks thin – This is normal! The thin batter bakes into a soft, fluffy cake. That’s part of what makes this recipe so good.
-
Mix just until combined – Once the wet and dry ingredients are mixed, and the water is added, don’t overmix. Overmixing can make the cake tough instead of light.
-
Check the cake early – Start checking at 30 minutes. If a toothpick comes out with just a few moist crumbs, it’s done. Every oven is a little different.
-
Let the cake cool completely before frosting – If the cake is even slightly warm, the frosting can melt and slide off. Cooling on a wire rack helps speed this up.
-
Frost it your favorite way – This cake is great with any kind of frosting! Try vanilla, buttercream, or this easy chocolate chip frosting.
-
Make it ahead if needed – This cake stays moist for days, so it’s perfect for baking the day before a party. Just store it covered at room temperature.
-
Turn it into cupcakes or a sheet cake – This batter works great for cupcakes (bake about 20 minutes) or as a single-layer sheet cake. Super flexible and still delicious!
Variations And Substitutions
-
Dairy-free version – You can easily make this cake dairy-free by swapping the milk for any plant-based milk like almond milk, oat milk, or soy milk. Make sure it’s unsweetened to keep the sugar level balanced. This change won’t affect the texture, and the cake still comes out rich and moist.
-
Egg-free substitute – For an eggless version, use a commercial egg replacer or try flax eggs (1 tablespoon ground flaxseed + 3 tablespoons water per egg). This makes the cake vegan if you also use dairy-free milk. The texture will be slightly different but still very soft and tasty.
-
Gluten-free option – Replace the all-purpose flour with a 1:1 gluten-free flour blend designed for baking. These blends usually already contain xanthan gum to help with structure. The cake may be a little more delicate, so handle with care when removing from the pans.
-
Stronger chocolate flavor – If you want a more intense chocolate taste, use dark cocoa powder instead of regular cocoa. You can also add a teaspoon of instant espresso powder to deepen the chocolate flavor without making the cake taste like coffee.
-
Different pan sizes – This batter works well in all kinds of pans. Bake it in a 9×13 sheet pan, a Bundt pan, or turn it into cupcakes. Just adjust the bake time—cupcakes take around 20 minutes, and Bundt cakes usually need 45–50 minutes.
-
Frosting flexibility – While this cake is delicious with almost any frosting, it pairs especially well with this chocolate frosting made from chocolate chips. But you could also use vanilla buttercream, cream cheese frosting, or even just a dusting of powdered sugar.
-
Add-ins and toppings – Stir in chocolate chips, chopped nuts, or swirl in peanut butter or raspberry jam before baking for a fun twist. You can also top it with sprinkles, coconut, or crushed cookies after frosting for extra flair.
-
Sugar substitute – If you need a lower-sugar version, try replacing some of the sugar with a sugar substitute that’s meant for baking (like monk fruit or erythritol blends). Just be sure to follow the conversion guidelines on the package.
Storage and Reheating
-
Room temperature storage – If the cake is frosted with a shelf-stable frosting like buttercream or chocolate chip frosting, you can store it covered at room temperature for up to 3 days. Use a cake dome, airtight container, or even wrap it with plastic wrap to keep it fresh.
-
Refrigerating – If you use a frosting that contains cream cheese or whipped cream, store the cake in the fridge. Make sure it’s tightly covered to prevent it from drying out. Let it sit at room temperature for about 30 minutes before serving to bring back that soft, fluffy texture.
-
Freezing – You can freeze the unfrosted cake layers for up to 3 months. Wrap each cooled layer tightly in plastic wrap, then again in foil, and place in a freezer-safe bag or airtight container. To thaw, place the layers in the refrigerator overnight or let them sit at room temperature (still wrapped) until fully thawed.
-
Freezing frosted cake – You can also freeze the fully frosted cake or individual slices. Just freeze uncovered for about an hour to harden the frosting, then wrap and store. To enjoy, unwrap and let thaw at room temperature until soft and delicious again.
-
Reheating slices – For a warm, cake-shop-style experience, microwave a slice for about 10–15 seconds. It’ll taste like it just came out of the oven—especially if you serve it with a scoop of ice cream!
Frequently Asked Questions
Can I make this cake ahead of time?
Yes! This one bowl chocolate cake is a great make-ahead dessert. You can bake the layers a day or two in advance and store them covered at room temperature. If you want to make it even earlier, you can freeze the unfrosted layers and thaw them when ready to decorate. The cake stays moist and flavorful, even after a couple of days, making it ideal for parties or events.
Can I use this recipe to make cupcakes?
Absolutely! This batter works great for cupcakes. Just pour it into cupcake liners in a muffin tin, filling each about two-thirds full. Bake at 350°F for 18–22 minutes, or until a toothpick comes out clean. It should make about 24 standard-sized cupcakes, depending on how full you fill the cups.
Why is the batter so thin?
Don’t worry—the thin batter is actually the secret to this cake’s soft, fluffy texture. Once the boiling water is added, the mixture becomes very runny, which may seem strange. But this step activates the cocoa powder and helps create that moist, tender crumb. Trust the process, and you’ll love the results!
What kind of cocoa powder should I use?
Regular unsweetened cocoa powder works perfectly in this recipe. However, you can use dark cocoa powder if you prefer a richer, deeper chocolate flavor. Just keep in mind that it may make the cake slightly less sweet. Either option bakes up beautifully.
Can I make this cake gluten-free?
Yes, you can! Use a 1:1 gluten-free flour blend designed for baking (look for one that includes xanthan gum). The texture will be slightly different—maybe a bit more delicate—but still delicious. Make sure to check the labels on other ingredients if you’re baking for someone with gluten intolerance.
How should I frost this cake?
This cake is versatile and goes well with all kinds of frosting. Try classic vanilla, cream cheese frosting, or chocolate buttercream. For something simple and delicious, use this chocolate chip frosting made with melted chocolate chips. You can also dust the top with powdered sugar for a lighter finish.
Can I bake this in a different pan?
Yes! This recipe is very flexible. It works in a 9×13-inch sheet pan, a Bundt pan, or even as a single-layer cake. Just adjust the bake time accordingly—sheet cakes and Bundt pans will usually take longer than round pans, so keep an eye on the oven and use a toothpick test for doneness.
How do I keep the cake from sticking to the pan?
Be sure to grease and flour your pans thoroughly before pouring in the batter. You can also line the bottoms with parchment paper for extra insurance. Let the cakes cool for 10 minutes in the pans before removing them. That helps them release more easily without breaking.
How long will this cake stay fresh?
The cake will stay fresh for up to 3 days at room temperature if covered tightly. If refrigerated or frozen properly, it can last much longer. The texture stays soft and moist, especially if you store it well covered. It’s a great dessert to enjoy over several days—or even save a slice for later!
Other Easy Chocolate Recipes
Lava Cakes in the Air Fryer – These air fryer lava cakes have a warm, gooey chocolate center and are ready in minutes with no prep work needed!
Chocolate Peanut Butter Smoothie – This rich and creamy chocolate peanut butter smoothie is packed with protein and perfect for a quick breakfast or post-workout treat.
Easy Chocolate Chip Scones – These homemade chocolate chip scones are buttery, tender, and filled with melty chocolate in every bite.
Chocolate Chess Pie Recipe – This classic Southern chocolate chess pie has a fudgy, brownie-like filling and a flaky pie crust that’s absolutely irresistible.
Chocolate Cherry Cake – This chocolate cherry cake is made with cake mix and cherry pie filling for a super moist, rich dessert with minimal effort.
Air Fryer Chocolate Crescent Roll Croissants – These flaky chocolate croissants made with crescent rolls in the air fryer are an easy and delicious bakery-style treat.
Chocolate Covered Popcorn – This easy chocolate covered popcorn recipe makes the perfect sweet and salty snack for movie nights or homemade gifts.
One Bowl Chocolate Cake
Want to save this recipe?
Ingredients
- 2 cups white sugar
- 1 ¾ cups all-purpose flour
- ¾ cup unsweetened cocoa powder
- 1 ½ tsp baking powder
- 1 ½ tsp baking soda
- 1 tsp salt
- 2 large eggs
- 1 cup milk
- ½ cup vegetable oil
- 2 tsp vanilla extract
- 1 cup boiling water
Recommended Kitchen Tools (click the links below to see the items used to make this recipe)
- 2 9-inch round cake pans
- Electric hand mixer or stand mixer
- Rubber spatula
- Wire cooling rack
Instructions
- Preheat your oven to 350°F. Grease and flour two 9-inch round cake pans.
- In a large bowl, whisk together the sugar, flour, cocoa powder, baking powder, baking soda, and salt.
- Add eggs, milk, oil, and vanilla. Beat on medium speed with an electric mixer for 2 minutes until smooth.
- Slowly stir in the boiling water. The batter will be thin — that’s what makes the cake so moist!
- Divide the batter evenly between the prepared pans.
- Bake for 30–35 minutes, or until a toothpick inserted in the center comes out clean.
- Let the cakes cool in the pans for 10 minutes, then transfer to a wire rack to cool completely.
- Once cooled, frost with your favorite frosting. For an easy and delicious option, try this frosting made with chocolate chips
Notes
- Don’t worry if the batter looks thin after adding boiling water — that’s what makes the texture so fluffy and moist.
- This recipe makes a great base for cupcakes too. Just reduce the baking time to about 20 minutes.


Perfection!